这次是DesignMode系列的第三期,是书上第六章,关于装饰模式的讲解,前两次一直用wpf,这次准备用unity来写这个简单实例,原理是一样的,只不过是客户端的改变。
使用软件Visual Studio2013,Unity3D。
打开Unity3D新建项目,新建C#脚本Person类:
using System.Collections;
using System.Collections.Generic;
using UnityEngine;

 class Person  {

 public Person()
 {

 }

 private string name;
 public Person(string name)
 {
     this.name = name;
 }
 public virtual void Show()
 {
     Debug.Log("装扮的"+name);
 }
}
再新建服饰父类Finery,和子类Coat,Dress,Hair,Hat,Necklace,Shirt,Shoes,Skirt,Socks
using System;
using System.Collections.Generic;
using System.Linq;
using System.Text;


class Finery:Person
{
protected Person component;

public void Decorate(Person component)
{
    this.component = component;
}

public override void Show()
{
    if (component != null)
    {
        component.Show();
    }
}
}
---------------------
using System;
using System.Collections.Generic;
using System.Linq;
using System.Text;
using UnityEngine;

class Coat:Finery
{
public override void Show()
{
    Debug.Log("外套");
    base.Show();
}
}
---------------------
using System;
using System.Collections.Generic;
using System.Linq;
using System.Text;
using UnityEngine;

class Dress:Finery
{
public override void Show()
{
    Debug.Log("连衣裙");
    base.Show();
}
}
---------------------
..........
后面的类基本类似
最后建立客户端类WearCloths,继承MonoBehavior
using System;
using System.Collections.Generic;
using System.Linq;
using System.Text;
using UnityEngine;

public class WearCloths :MonoBehaviour
{

void Start()
{
    Person kaixin = new Person("开心");
    Debug.Log("\n第一种装扮:");

    Coat coat = new Coat();
    Hair hair = new Hair();
    Skirt skirt = new Skirt();

    coat.Decorate(kaixin);
    hair.Decorate(coat);
    skirt.Decorate(hair);

    skirt.Show();

    Debug.Log("\n第二种装扮:");

    Dress dress = new Dress();
    Hat hat = new Hat();
    Necklace necklace = new Necklace();
    Shirt shirt = new Shirt();
    Socks socks = new Socks();

    dress.Decorate(kaixin);
    hat.Decorate(dress);
    necklace.Decorate(hat);
    shirt.Decorate(necklace);
    socks.Decorate(shirt);

    socks.Show();

}
}
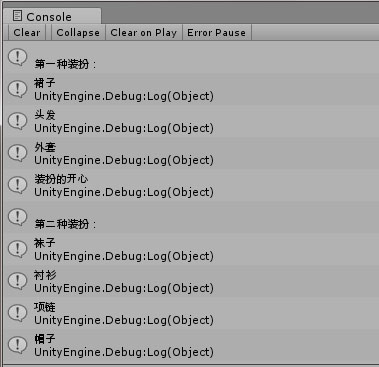
控制台输出显示: